

Hello Fellas !!
This time I came up with Fashion DIYs!!
Love fashion? Hate the price tag? Then make your own fashionable clothes and become a trend setter . Recreate ur flats sweater jeans you won’t have to go shopping for a while. You can create them from scratch or upcycle old clothes you already have into new stylish items. Update your closest with these must have tutorials.
Take your old stuff and make something new and interesting.
It’s easy to craft stylish clothes with a few easy steps that will help you revamp your wardrobe.
Apply some of these nifty DIY clothing ideas to your own wardrobe.
With the help of these tutorials you can turn your old clothes into new trendy and stylish pieces.
Clothes are expensive, especially if you are someone who loves to dress in the hottest trends. However, you can save money and exercise your creative muscle by simply making your own DIY styles. Created a list of the hottest and easiest DIY styles so that you can wear the latest trends without breaking the bank. Head over to the below to see what you can create.
1. DIY OPEN BACK SWEATER WITH SATIN BOW
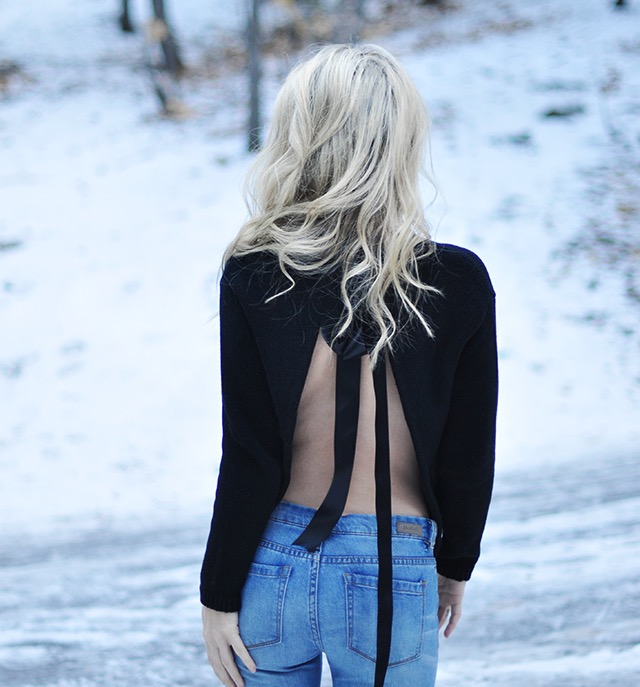
Open back sweater DIY! I just can’t help myself though, and I love my latest version.
I found this sweater at the local store for 400 and so I bought three of them. I figured I’d DIY one or two, and I did… but this third one has been sitting in my drawer unworn since I bought it. Recently when I realized I’d been wearing my Pin back version too often, I decided it was time to make another one because as much as I love the way this sweater style hangs in the front, I HATE the long back, so I never wear it… and this was my alternative… and I absolutely LOVE IT.
NOTE: In the photo, Its a braless, but most probably in real life, I’d wear it either layered over a strappy bra, or a lace bodysuit, especially now, in the winter…
Here’s What You’ll Need…

* Sweater, preferably with a medium knit and a heavy weight to it. Mine is 55% cotton 45% acrylic
* Scissors
* Needle & thread & pins
* Large satin ribbon
Steps…

Lay your sweater flat, front down and decide where you want to cut.
If you feel more comfortable marking it out, turn it inside out, draw your cut lines with a ruler.
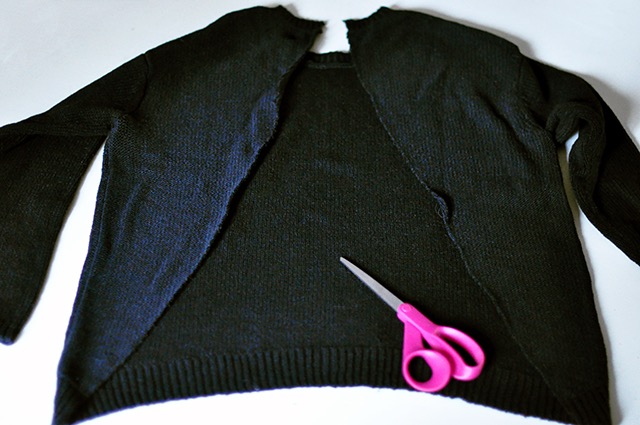
Instead of cutting a straight panel from the back, as I did with my DIY Safety Pin Sweater, I cut a triangle shape, beginning from the edges and tapering inward toward the collar.
NOTE: My sweater is a high-low… longer in the back, making the sides dip down a bit.

Roll in the edges and pin your new sweater hem.

Using a hemstitch, create your new back edges by sewing the raw edges under.
* NOTE: this worked far better than the running stitch I used in my Saftety Pin Back Sweater because you can’t really see any of the stitches here, whereas in the other one, you can.
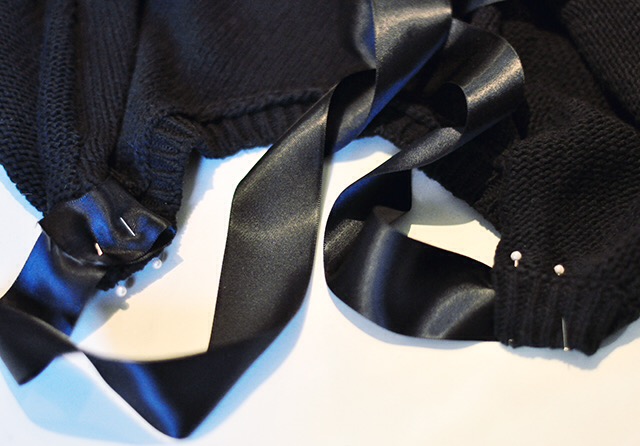
Take two large ribbons satin ribbons, cut a flat edge and carefully singe it with a lighter to prevent fraying. Fold the end under twice and pin each to the back side of your sweater collar.
Leave your ribbons as long or as short as you wish and cut your ribbon ends into a pretty V shape and finish with another singe.
And… Voila!
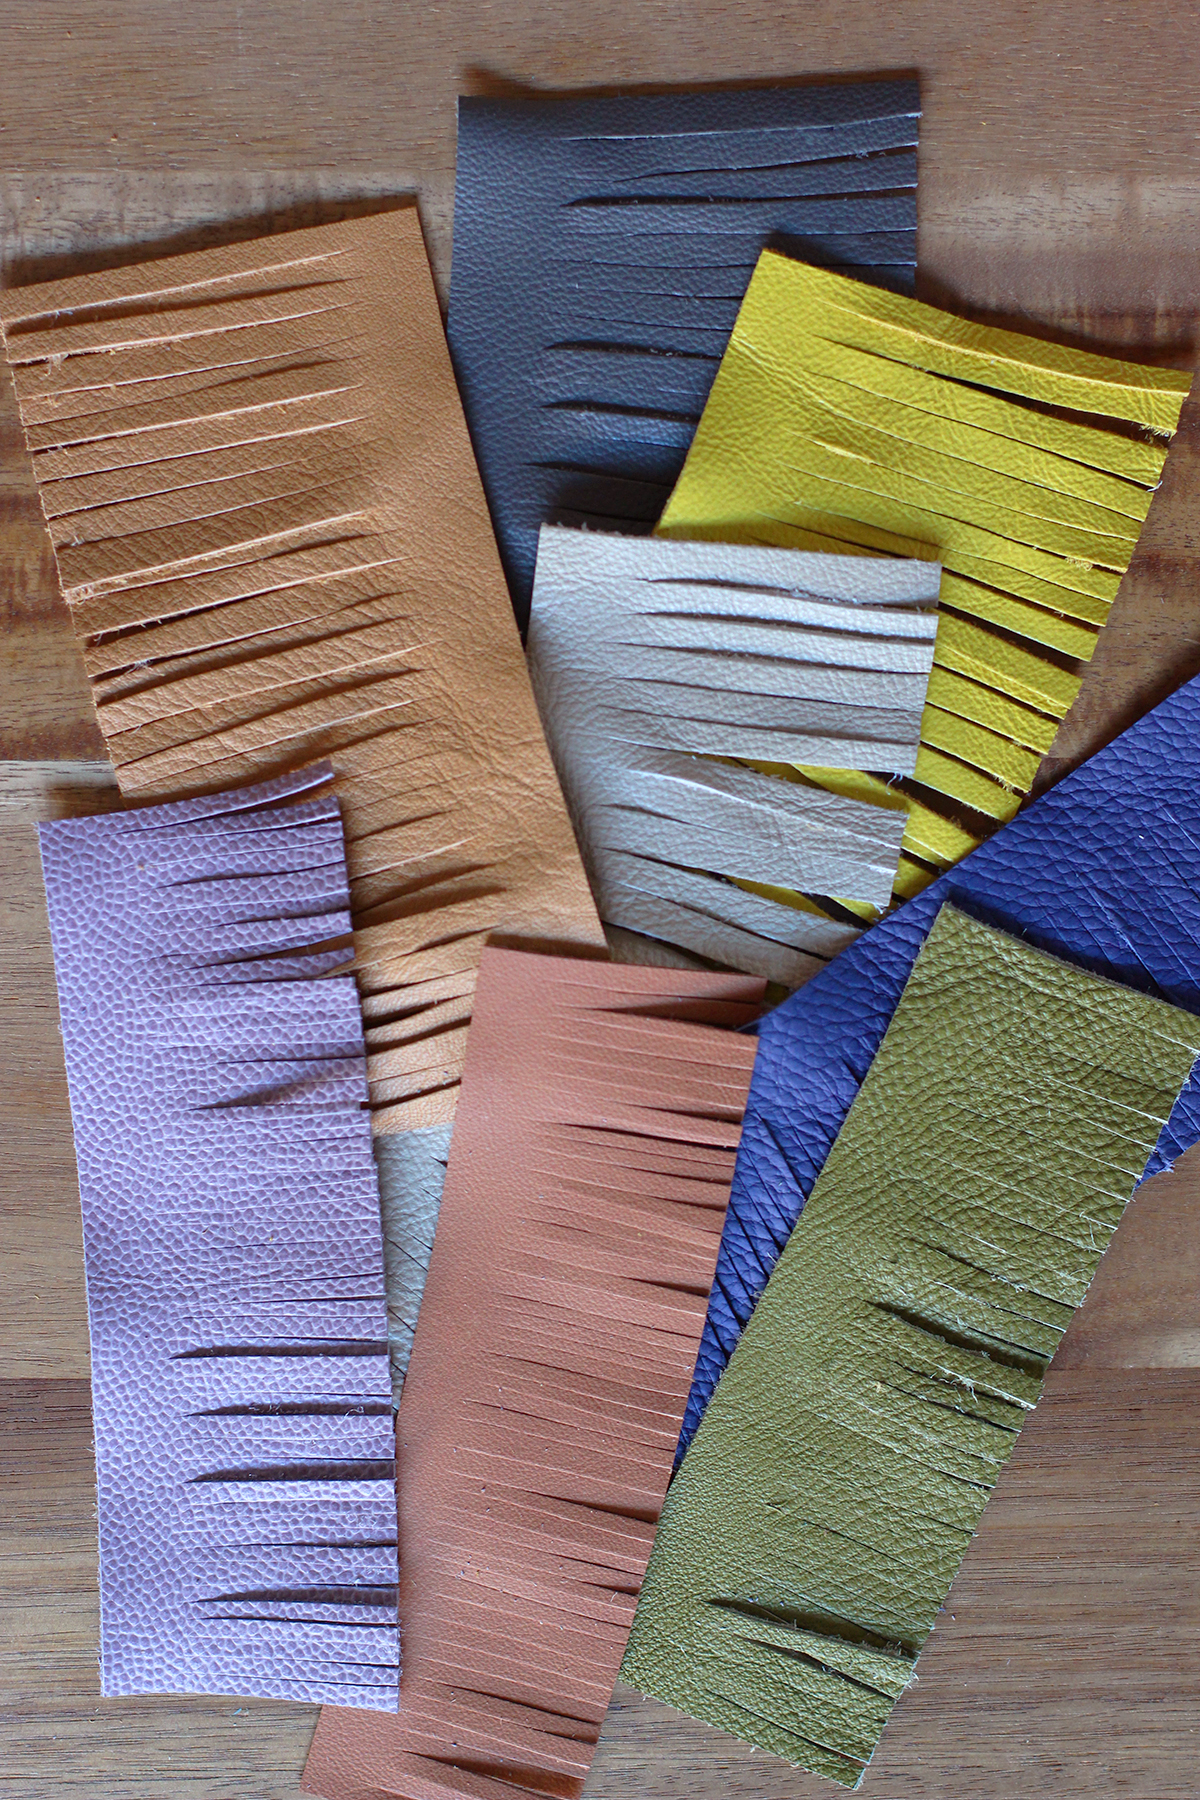
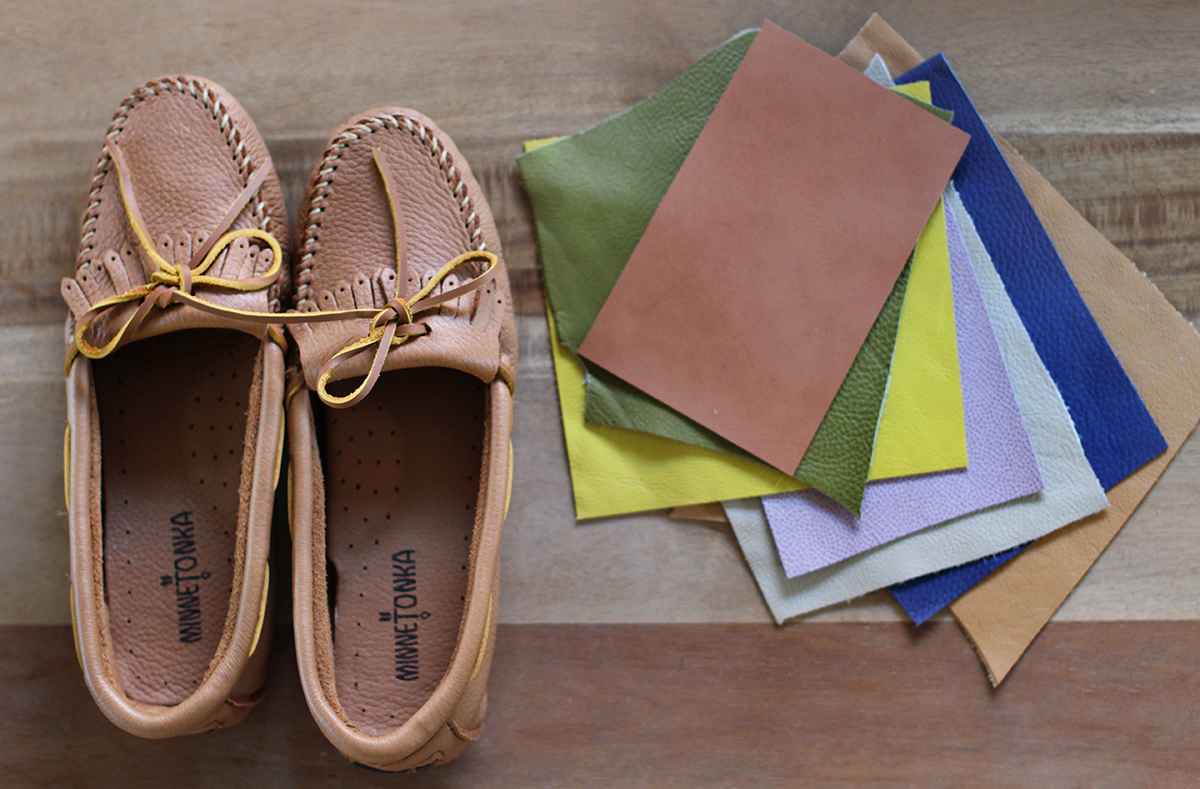
2. DIY TasselI’ve been wearing Loffers from long time . They’re irresistibly comfortable and age so wonderfully over time, molding to my feet in a way that makes me never want to replace them .My love of tassels, I made these fun and colorful versions that are perfect for fall. They’re incredibly easy to make and if you’re able to track down enough leather remnants, you can change the tassels out depending on color and abundance!

You’ll need:
• a pair of Loffers or any footwear which u like
• assorted scrap leather
• tacky glue
• sharp scissors
• ruler

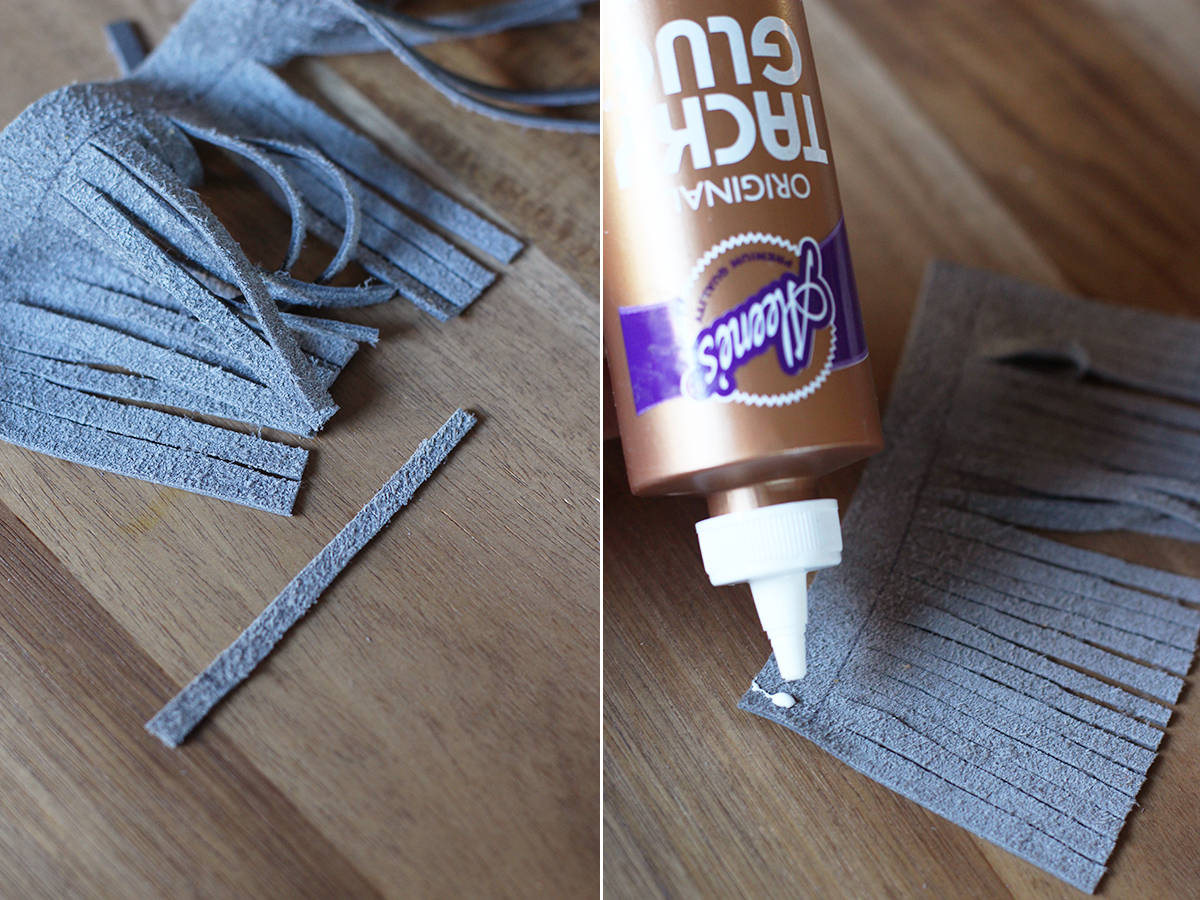
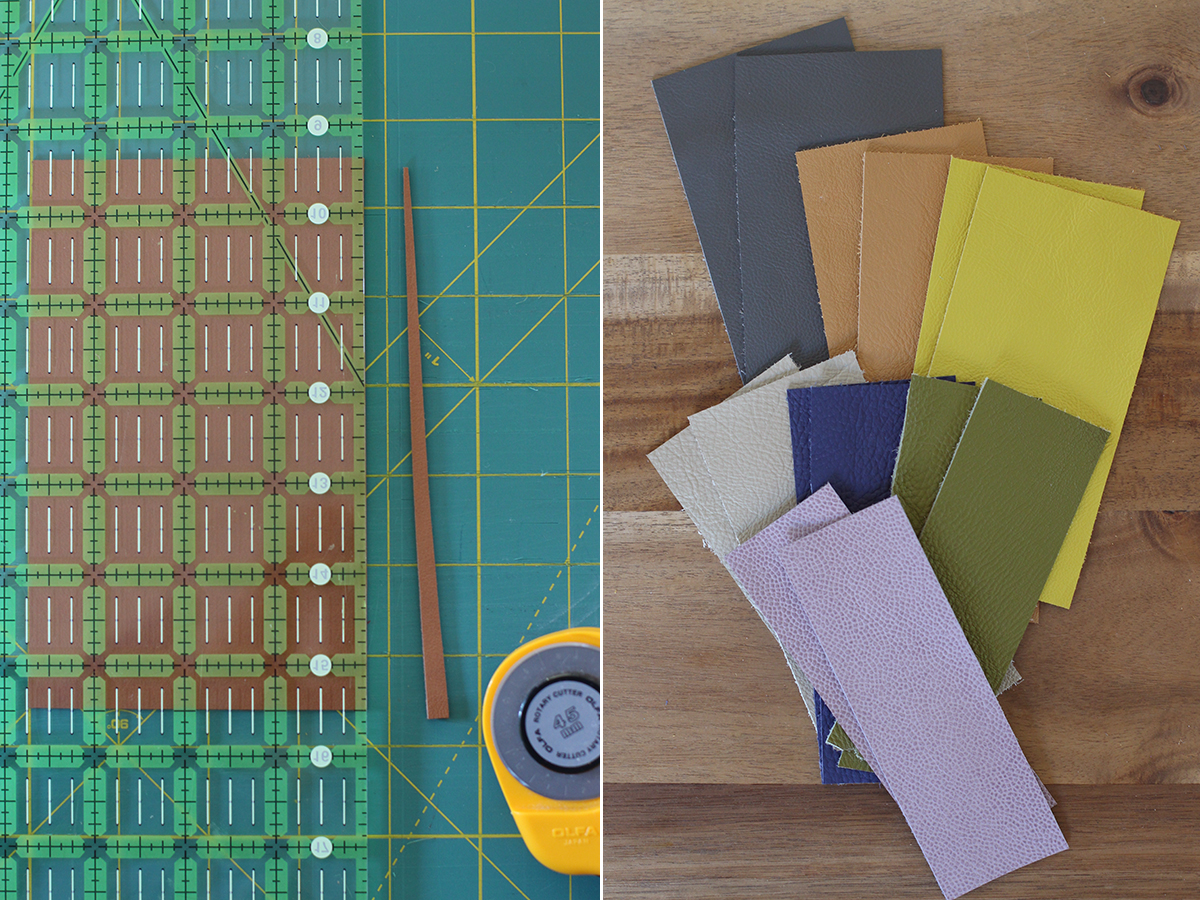
Start by trimming the remnants down to perfect squares. I just tried maximizing each remember by trimming the least amount possible to make it a rectangle that measured between 6 x 3 inches and 4 x 3 inches. Once you have an assortment of rectangular leather pieces, in a variety of colors, you can divide those in half lengthwise to create strips that measure between 3 x 3 inches and 2 x 3 inches. Remember, you’ll need one of each to make 2 tassels of each color.

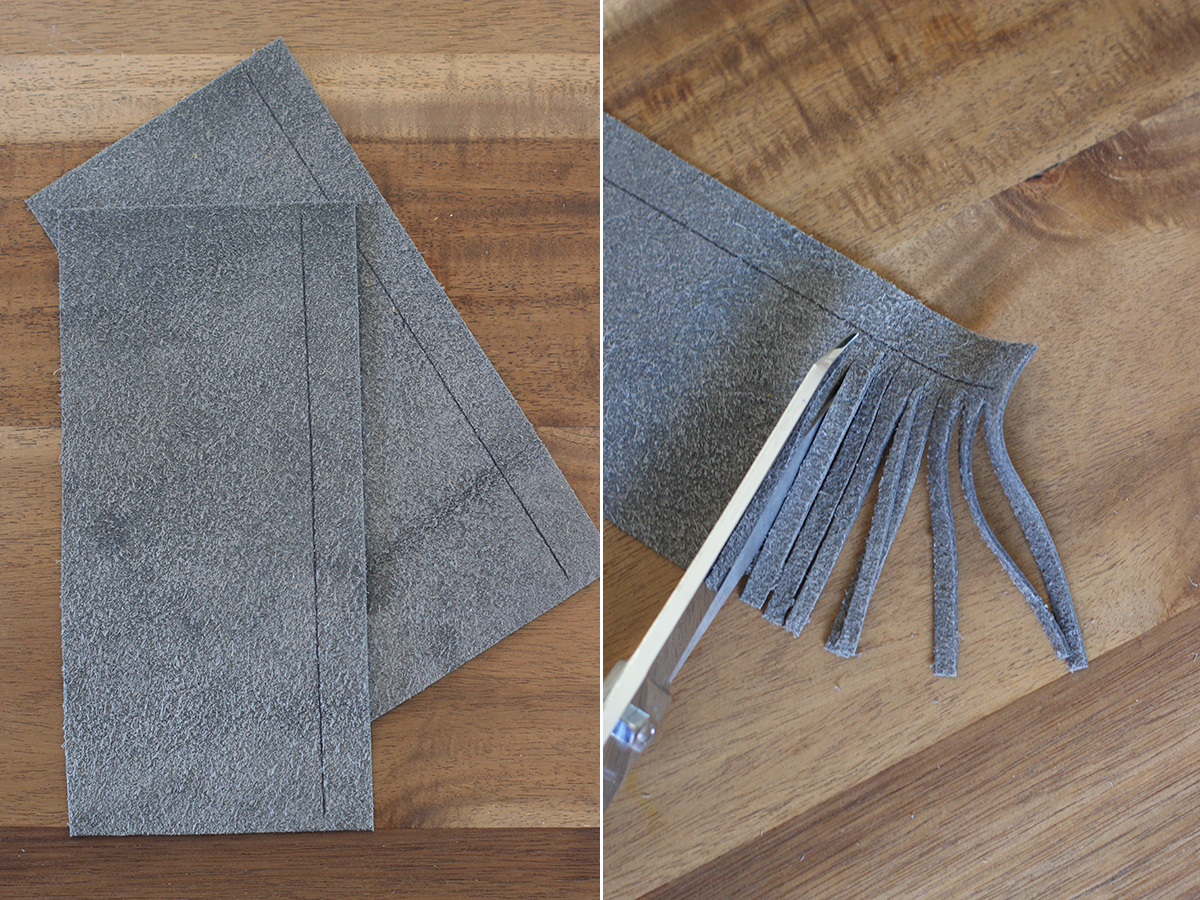
Turn the leather over and draw a half 1/4 inch line across the top, lengthwise. Cut a fringe without going past that line. A sharp pair of fabric shears will give you a clean cut.

Your fringed pieces should look like this!
Cut off the end piece off of each fringed piece and set aside. Place a small dollop of tacky glue on the top corner at one end of the fringed piece.
Place the thin piece of leather you cut off earlier on top of the glue. Fold in half and seal it with another small dollop of glue. Then, draw a very thin line of glue across the top and roll the leather tightly.
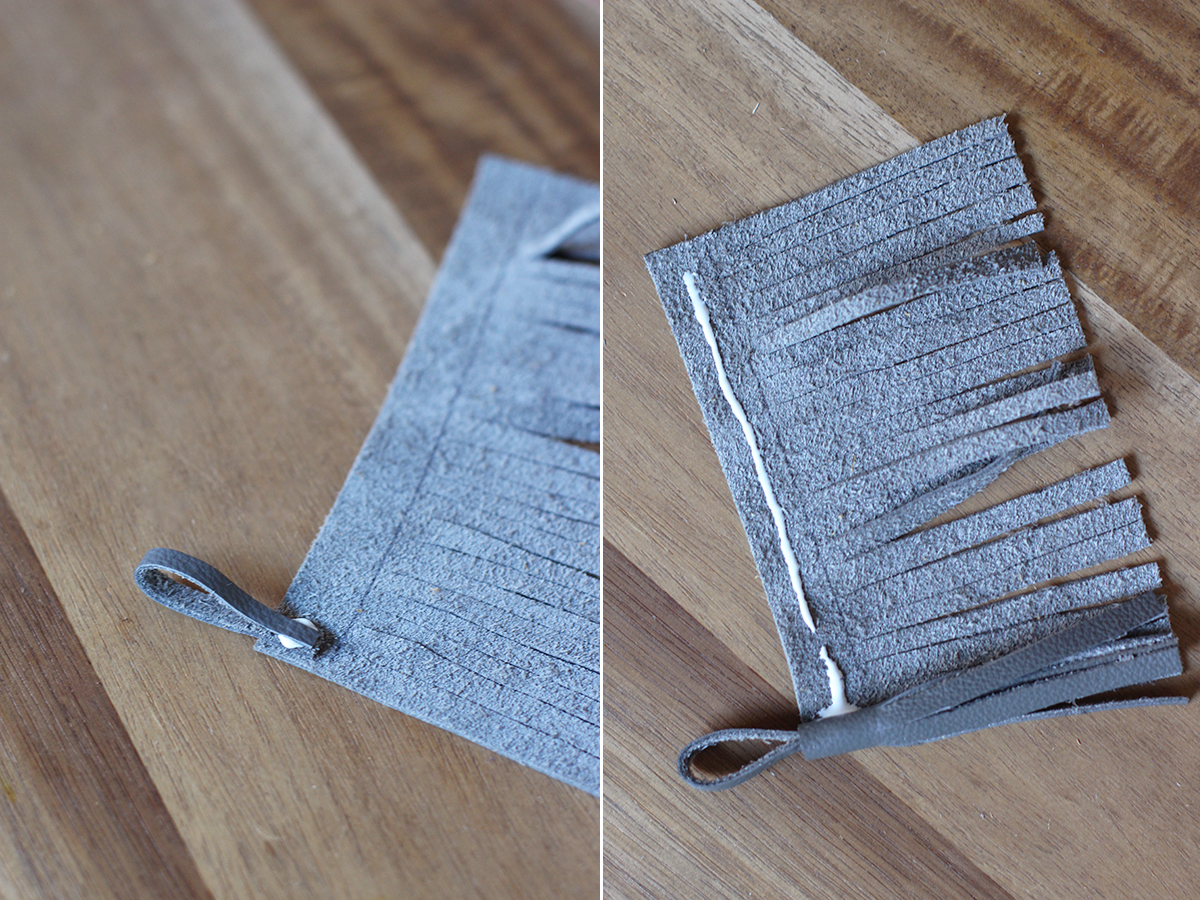
Hold the tassel closed for a couple of minutes before setting it aside to dry completely. Make the rest of the tassels.

To assemble the shoe, simply untie the laces on the moccasins. Thread the tassels onto each each lace – alternating them from longest to shortest.

Push the tassels as close together as possible and tie into a tight knot.

And that’s it – tassel moccasins done! You can even trim them if you feel like the tassels are too long. And remember, these are non-permanent so feel free to change out the colors whenever you see fit. Enjoy!


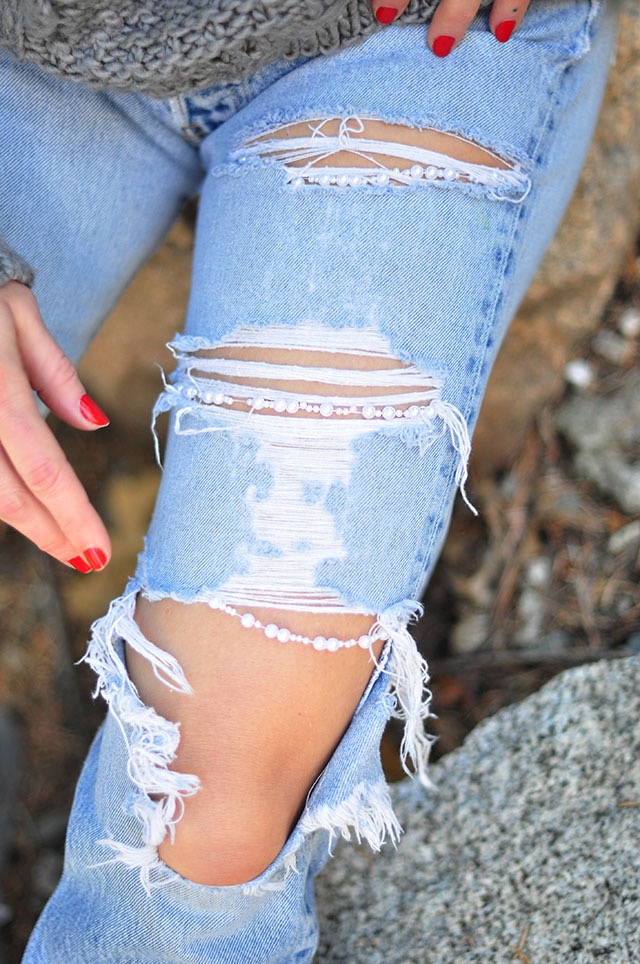
3. EMBELLISH YOUR DENIM RIPS // DIY RIPPED PEARL JEANS

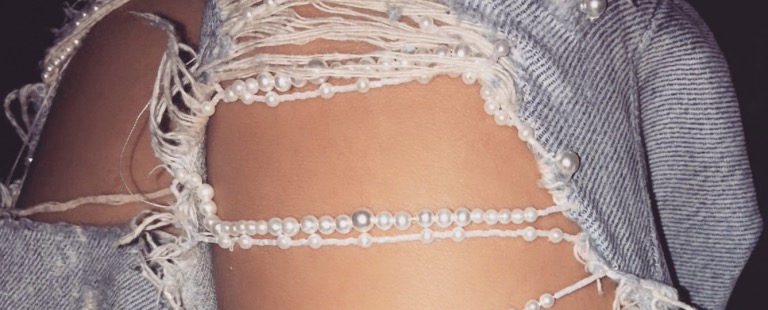
I randomly clicked on Gigi Hadid’s Twitter account the other day and noticed her header photo was of just her knees, wearing jeans with strings of pearls within the rips in her jeans… AND I LOVED IT!
I’ve done a lot of pearl embellished DIYs, and even a pair of DIY Pearl Embellished Jeans, but I never thought about interweaving the pearls among the rips.
I did far fewer pearl strands than my inspiration photo, because I wanted just a subtle pearl moment, but you can do as many as you like!
Inspiration…
Here’s What You’ll Need…

Ripped jeans… or rip em yourself
Plastic pearls… I used a small pearl and then seed beads in between
Needle/Thread/Scissors
NOTE: this took me about five minutes to complete!
Also NOTE: Although you CAN machine wash these, I’d probably hand wash them and hang or lay them to dry.
Steps…
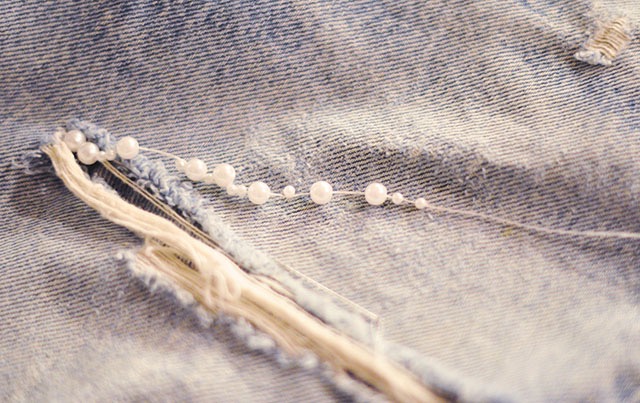
Double thread your needle and knot the end.
Make sure your thread is at least a few inches longer than your rips… thread your needle through your jeans at the corner/side of your rips and knot it.
String on your beads with a little space in between them.
Every so often, create a knot around a seed bead so that your beads stay within their specific area instead of just all falling to the center of the thread.

Make sure you keep your thread as loose as the threads in between your rips so that they will hang in the same fashion. You don’t want them too tight against your leg.
Bead until you get to the other side, and knot your thread through the edge of your denim rips… make sure you secure it in a place that isn’t going to rip more and just fall out.
Add as many strings of pearls as you like!
And… Voila!


Have Fun!
4. HOW TO MAKE A SHOULDER CUT-OUT SWEATER DIY

This navy one has been sitting in my sweater drawer with the tags on it until last Friday. And now it’s got a whole new look!
What I love about this look is that because of the heavy and loose drape of the sweater, it has a really easy feel to it. It’s comfortably casual, but still chic and pretty.
Here’s What You Need…

Sweater / preferably with shoulder seams from the neck to the arm
Matching thread + needle
Scissors
Steps…

Using a sharp pair of little scissors, CAREFULLY cut the top shoulder seam from neck to arm WITHOUT cutting into the neck or arm seams.
NOTE: If your shoulder doesn’t have a shoulder seam, you’ll have to try it on and measure where exactly the top of the shoulder hits, mark it, then cut it, following the step above.

Roll the edges of your open knit under twice so that the raw edge is completely hidden.

Beginning at the neck, run an easy straight hand stitch along the roll, making sure the smallest amount of thread shows on top and the larger stitches are hidden beneath. Make sure to finish the neck and arm points so that it looks completely smooth.
NOTE: depending on the type of knit of your sweater, you may see a few puckers along your sides, just be careful not to pull too tightly while stitching… keep it nice and loose, but secure.
And really, that’s it!
And… Voila!
That’s all for today 😘😘😘
For sure I will be back soon something more interesting 😍😍
Do let me know about this either u like it or not 🙏🏻
Ur feedback is really mean to me 😘
Pls follow n subscribe my blog☺️☺️
Love u loads n tataahhh ☺️☺️

Good luck swati 😘😘
N srsly these hacks are awsomeee 😍😍
I will surely try out 😌
LikeLike
Very nice dear 😘
LikeLike